Spring Boot Starter Data Redis for Data Storage on Redis Server
Tags: Java Spring Boot Redis Jedis Data
Introduction
In this post, we are going to learn how to use Redis as data persistence for our Spring Boot Application by using Spring Boot Starter Data Redis and Jedis Client.
What is Redis?
Redis is an open source (BSD licensed), in-memory data structure store, used as a database, cache and message broker. For more information you can visit Redis home page at redis.io
Install and Start Redis Server on Ubuntu
Follow these commands to set up and start Redis database server on your Ubuntu box.
sudo apt-get update
sudo apt-get upgrade
sudo apt-get install redis-server
sudo service redis-server restart
Create New Spring Boot Project
From Spring Tool Suite IDE select menu File > New > Spring Starter Project.
On the New Spring Starter Project popup input new project spring-boot-redis information as following screenshot.

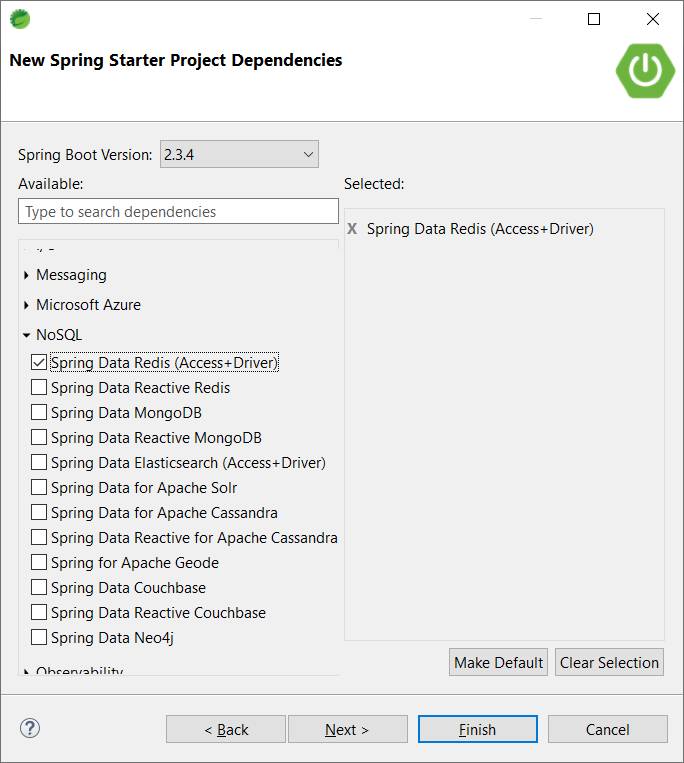
On the New Spring Starter Project Dependencies popup choose Spring Data Redis (Access+Driver) dependency as below screenshot.
You can also creating new Spring Boot project using Spring initializr online tool at start.spring.io
Add Jedis Client Dependency
Add the following Jedis Client dependency to your build.gradle file.
compile group: 'redis.clients', name: 'jedis', version: '3.3.0'Or use the following XML to add dependency in pom.xml file if you are using Maven build for your project.
<dependency>
    <groupId>redis.clients</groupId>
    <artifactId>jedis</artifactId>
    <version>3.3.0</version>
</dependency>
Configure Redis in your Spring Boot Project
Add new Java packaged named dev.simplesolution.config then add the new class RedisConfig.
package dev.simplesolution.config;

import org.springframework.context.annotation.Configuration;
import org.springframework.data.redis.repository.configuration.EnableRedisRepositories;

@Configuration
@EnableRedisRepositories(basePackages = "dev.simplesolution.repository")
public class RedisConfig {

}Next step, creating new bean for Redis server setting, in our sample application we use RedisStandaloneConfiguration, you can change the host name and port based on your Redis server connection.
@Bean
public RedisStandaloneConfiguration redisStandaloneConfiguration() {
	RedisStandaloneConfiguration config = new RedisStandaloneConfiguration();
	config.setHostName("localhost");
	config.setPort(6379);
	return config;
}Next step creating a new bean for JedisConnectionFactory. We use redisStandaloneConfiguration bean above to create the connection factory.
@Bean
public JedisConnectionFactory jedisConnectionFactory() {
	return  new JedisConnectionFactory(redisStandaloneConfiguration());
}
Creating bean for RedisTemplate with connection factory jedisConnectionFactory from previous step.
@Bean
public RedisTemplate<String, Object> redisTemplate() {
	RedisTemplate<String, Object> redisTemplate = new RedisTemplate<>();
	redisTemplate.setConnectionFactory(jedisConnectionFactory());
	return redisTemplate;
}
Your final RedisConfig class as following code.
package dev.simplesolution.config;

import org.springframework.context.annotation.Bean;
import org.springframework.context.annotation.Configuration;
import org.springframework.data.redis.connection.RedisStandaloneConfiguration;
import org.springframework.data.redis.connection.jedis.JedisConnectionFactory;
import org.springframework.data.redis.core.RedisTemplate;
import org.springframework.data.redis.repository.configuration.EnableRedisRepositories;

@Configuration
@EnableRedisRepositories(basePackages = "dev.simplesolution.repository")
public class RedisConfig {

	@Bean
	public RedisStandaloneConfiguration redisStandaloneConfiguration() {
		RedisStandaloneConfiguration config = new RedisStandaloneConfiguration();
		config.setHostName("localhost");
		config.setPort(6379);
		return config;
	}

	@Bean
	public JedisConnectionFactory jedisConnectionFactory() {
		return  new JedisConnectionFactory(redisStandaloneConfiguration());
	}

	@Bean
	public RedisTemplate<String, Object> redisTemplate() {
		RedisTemplate<String, Object> redisTemplate = new RedisTemplate<>();
		redisTemplate.setConnectionFactory(jedisConnectionFactory());
		return redisTemplate;
	}
}
Implement Entity and Repository
Add new Java packaged named dev.simplesolution.entity then implement a new User entity class.
package dev.simplesolution.entity;

import java.io.Serializable;

import org.springframework.data.redis.core.RedisHash;

@RedisHash("User")
public class User implements Serializable {
	private Long id;
	private String username;
	private String firstName;
	private String lastName;

	public Long getId() {
		return id;
	}
	public void setId(Long id) {
		this.id = id;
	}
	public String getUsername() {
		return username;
	}
	public void setUsername(String username) {
		this.username = username;
	}
	public String getFirstName() {
		return firstName;
	}
	public void setFirstName(String firstName) {
		this.firstName = firstName;
	}
	public String getLastName() {
		return lastName;
	}
	public void setLastName(String lastName) {
		this.lastName = lastName;
	}

	@Override
	public String toString() {
		return "User [id=" + id + ", username=" + username + ", firstName=" + firstName + ", lastName=" + lastName + "]";
	}
}
Add a new Java package named dev.simplesolution.repository then define UserRepository interface as following code.
package dev.simplesolution.repository;

import org.springframework.data.repository.CrudRepository;
import org.springframework.stereotype.Repository;

import dev.simplesolution.entity.User;

@Repository
public interface UserRepository extends CrudRepository<User, Long> {

}
Test your code to store data to Redis server
Create TestRedisDataStore class as the following code that tries to store data and query data from Redis server. In this class we implements CommandLineRunner interface to indicate that it will be execute when Spring Boot application up and running.
package dev.simplesolution;

import java.util.ArrayList;
import java.util.List;

import org.slf4j.Logger;
import org.slf4j.LoggerFactory;
import org.springframework.beans.factory.annotation.Autowired;
import org.springframework.boot.CommandLineRunner;
import org.springframework.stereotype.Component;

import dev.simplesolution.entity.User;
import dev.simplesolution.repository.UserRepository;

@Component
public class TestRedisDataStore implements CommandLineRunner {

	private Logger logger = LoggerFactory.getLogger(SpringBootRedisApplication.class);

	@Autowired
	private UserRepository userRepository;

	@Override
	public void run(String... args) throws Exception {
		User user = new User();
		user.setId(100L);
		user.setUsername("john");
		user.setFirstName("John");
		user.setLastName("Doe");

		userRepository.save(user);

		List<User> users = new ArrayList<>();
		userRepository.findAll().forEach(users::add);
		for(User item : users) {
			logger.info("User: " + item.toString());
		}
	}
}
Final Application
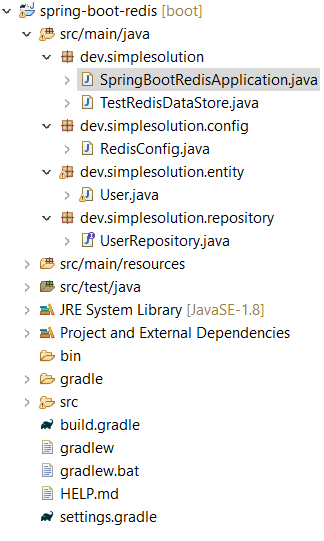
Your final Spring Boot application structure looks like the following screenshot.
Run the Spring Boot application and we can see the following logs in the console.
2020-10-18 14:53:32.786 INFO 11896 --- [ main] d.s.SpringBootRedisApplication : User: User [id=100, username=john, firstName=John, lastName=Doe]From your Ubuntu terminal, try to connect by command redis-cli and type HGETALL User:100 to show data on Redis server.
user@dev-box:~$ redis-cli
127.0.0.1:6379> HGETALL User:100
 1) "_class"
 2) "dev.simplesolution.entity.User"
 3) "id"
 4) "100"
 5) "username"
 6) "john"
 7) "firstName"
 8) "John"
 9) "lastName"
10) "Doe"
127.0.0.1:6379>
Conclusion
In this step by step tutorial we have learned how to configure and use Redis server for data storage in Spring Boot project by using Spring Boot Starter Data Redis and Jedis Client library.
Download Source Code
The source code in this article can be found at: github.com/simplesolutiondev/spring-boot-redis
or clone at:
git clone https://github.com/simplesolutiondev/spring-boot-redis.git
or download at:
Happy Coding 😊